Installation
Instructions
Read
all instructions prior to beginning installation. Make sure that you have
a soft surface to lay the outer face of the waterfall onto to prevent
scratching. A blanket or section of carpet will do. Letters in the
installation picture relate to lettered instructions below.
All parts can readily be purchased at places like Home Depot, Lowes, etc.
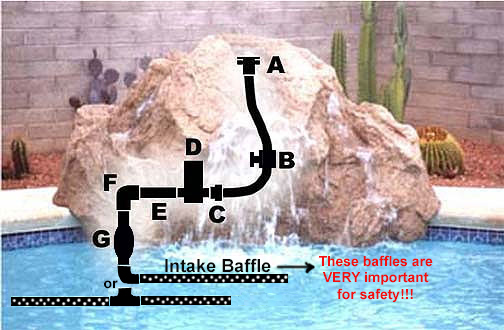
A) The water outlet fitting that is already installed at the top of your waterfall is a Hydro-Air brand high volume unit with a 1 1/2" slip fit. From the underside of the waterfall clean the lower opening of the fitting with a small amount of acetone to prepare for installation of the flex pipe (B). Be careful to not allow acetone to run onto the top surface of the waterfall. If this happens, do not wipe dry; allow to air dry.
B) A good idea is to place a Ball Valve somewhere along here to enable you to adjust the volume of flow. Use 1 1/2" schedule 40 flexible PVC spa hose to adhere into the slip fitting (A). Make sure to use fresh PVC pipe primer and adhesive (follow container's instructions). The length of hose should be long enough to naturally curve in a relaxed state to where the pump will be placed. The large waterfall uses approximately 5 feet, the medium uses approximately 4 feet, the small size uses approximately 3 feet.
C) Select an appropriately sized PVC reducer bushing to adapt the flexible hose (B) to the outlet of your pump (D). Adhere reducer bushing to flex pipe (B). Attach reducer bushing to pump after remaining pieces are prepared.
D) Use a non-submersible, in-line pump. Hook up power according the the manufacturer's instructions. For the large waterfall use a pump that flows up to 30 gallons per minute (gpm). The medium waterfall may produce a very small amount of splash at its sides at 30 gpm, so 20 gpm is recommended. Secure the pump to the deck after determining best location. It's always better to get a pump a little more powerful than required that you can tone down with the Ball valve (B) because, while you can tone down a more powerful pump, there is no way to get more volume from a too-weak pump.
E) Attach a short section of PVC rigid pipe to the inlet of the pump. A reducer bushing or hose clamp may be required. The section should be long enough to go from the pump location to about two inches overhanging the pool edge.
F) Select an appropriately sized PVC 90 degree elbow to direct the inlet pipe (E) toward the pool water. Adhere with PVC primer and adhesive.
G) Use a check valve here with the flow direction towards the pump. Make sure the check valve is above water level. This one-way flow valve keeps water always in the pipe by prohibiting gravity from emptying the pipe when you shut off the motor. Use a section of PVC pipe long enough to extend well down into the water behind the section of rock that protrudes into the water. This pipe can be located anywhere the rock protrudes below the water level. Adhere into elbow (F).
WARNING! Do not forget this part!
Intake Baffles - Extremely important that you install this final assembly. Simply place an "L" or a "T" beneath the check valve and glue in well-perforated PVC pipes...at least 2' total length. Take your 1/4" - 3/8" drill bit and start drilling holes into the pipe... at least 20 or more spread out over the 2' length. WHY? Imagine your powerful pump pulling water out of your pool at 25-30 gallons per minute or more. Then image some young child innocently playing in the water and seeing the pipe, without this baffle, and placing there fingers in...or heaven forbid, their mouth on the pipe. In less than a few seconds, the child could loose their tongue, even their entire insides...it would not be a pretty sight and could of course cause death. PUT ON THE BAFFLE...which allows water to enter through all of the perforations and minimizes any pressure if a child touches or is playing with the intake port.
Make sure all connections are properly primed & glued or tightened and secure. You can mount the waterfall to the pool deck using molded-in bolt flanges, and enjoy!